
I attempted to sew some knit garments last year. My results were mixed. This Lady Skater dress was a reasonable success and is currently being worn by my step-daughter (fabric purchased at Girl Charlee). But I wasn’t thrilled with the results I got using my regular sewing machine. When Rae launched the Isla Pattern, I decided to give knits another try but first I did research. And I got some great tips from Instagram friends and from Rae herself (check the comments on Rae’s instagram posts on this pattern-a wealth of info!) So this weekend when I had a bit of time, I decided to try making an Isla dress using some of these tips.
  I started this project after lunch and had the dress version finished before dinner. Based on my measurements I cut a Medium and added an inch both to the the bodice length and to the skirt. I am 5’9″ and I generally wear a Medium in Rae’s patterns and add 2 inches to most dresses so I thought I would try that and see how the fit was. The fabric is a jersey knit blend from Girl Charlee purchased on sale last year. I bought 3 yards for $6.60 each. This dress takes 2 yards. I will likely also make the top with this fabric-only takes 1 yard- and may try lengthening the bodice further to see which fit I prefer. I have found that it is worth it to make a wearable muslin and then actually wear it for a day to be sure you have the right fit. This fabric, while inexpensive, is actually something I will wear and it feels amazing to have a new dress and top for less than $20.
I didn’t iron the fabric before cutting it out, I just lay it as flat as I could straight out of the dryer. I tried a stretch stitch on my machine based on this post by Susan. It took a minute for me to get used to the stitch because the stitching process is much slower. The machine goes back over certain areas so I am not able to zip the fabric through the machine as I would with a straight stitch but once I got used to it, it worked really well. I used hand-wound stretch thread in the bobbin only, a stretch needle and polyester thread in the needle. And since I had issues with the fabric feeding in an uneven way with my regular foot, I took the plunge and bought a walking foot for my sewing machine. I found a simple tutorial online that showed me how to change the foot to the walking foot. There are many on You Tube. I cut my notches as triangles to make them easier to see.
  This is what the test sample of the stretch stitch looked like on a scrap.
 These are the settings I used for the stretch stitch which I used for all my seams.
  And here are the settings I used for the zig zag stitch that I used around the arms and neck to tack down the seam allowances after attaching the binding.
 Here is a close up of the arm binding with the zig zag sewn about 1/8th inch from the seam. The walking foot worked really well feeding the fabric in evenly and helped the machine handle the bulk where seams were joined.
 I used the same tension I always use for all of the stitching, even the gathering stitch with elastic thread, and it worked fine.
 The gathering technique is magical. Using elastic thread in the bobbin and a zig zag stitch, the skirt was gathered exactly the right amount. I have learned after sewing many MBR patterns to just trust Rae. She knows. Her instructions are straightforward and work great when followed.
I ended up making a mistake and sewed both shoulder seams and then realized that you aren’t supposed to do that until you add the neck binding. Oops! Luckily, I had recently read this tutorial by Erin which saved me. I don’t think I stretched the neck binding enough while sewing because it did start to gape a bit as the day wore on as seen below:
 but that may also be because I am very small busted. I will try to make the neckline binding a bit smaller next time ( I find that it usually takes me 2-3 tries to get a pattern down,) but I am overall really happy with my first version.
Although Rae doesn’t include it in the pattern, I zig-zagged a narrow ribbon to the shoulder seam allowances after sewing the seams for stability. I used a twin needle with stretch thread in the bobbin to sew the hem. I ironed the hem before sewing.
  I used wonder clips to hold the hem in place for sewing.
 Test fabric showing the twin needle hem.
 I used the presser foot edge as a seam guide and got really good results with the twin needle.
 Hem as stitched below.
 Hem seam as seen on the inside. It lies pretty flat but I think I will have even better results with a slightly heavier knit. This is pretty thin fabric.
  Twin needle settings below. (I take pictures so I remember for the next time.)
 Finished dress below. The bodice looks a little wonky on the hanger but it seems less so as worn. I think the next time I make this, I will sew my elastic gathering seam a bit farther away from the edge because my machine was chewing up the edge. It is actually amazing how well it ended up considering. I did not take out the stitches or redo the gathering or the seam where I joined the bodice to the skirt and it looks relatively even.
 And as worn. I am not sure if I want to keep the bodice this length or shorten it or lengthen it. This is with an added inch so you can see that it is pretty short as drafted. I have a really long torso and I haven’t decided which would be the most flattering.
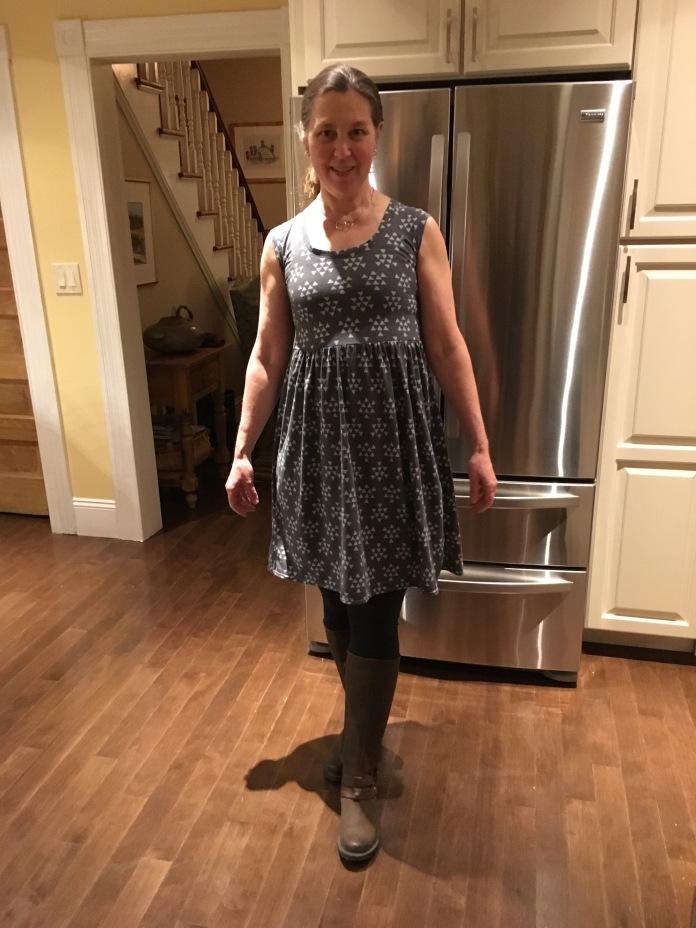 I am very happy with the fit around the arms and the neck.
 Back view.
 And with a cardigan which is how I will be wearing it this winter.
 This pattern is a quick sew. What I loved about it: gathering the skirt with elastic thread. Brilliant! I used a zig zag stitch, not a stretch stitch for gathering and sewing the bodice to the skirt with elastic thread in the bobbin. I highly recommend this pattern and the little knit tricks I learned above which enabled me to have a really nice result with a regular, inexpensive, sewing machine. Next time I will use the twin needle instead of the zig zag around the neck and arms, but otherwise, I am really happy with the results. This pattern is a keeper!

Oh, this is so cute on you! Love that fabric… I haven’t shopped at girl Charlee in a long time, but I may need to check it out!
LikeLiked by 1 person
Thanks Erin! I am planning to make a couple of other versions in some Art Gallery knits but you can’t beat the prices at Girl Charlee.
LikeLike
Very nice on you! While I love the simplicity of Rae’s patterns, most have that short bodice/empire waist seam that I don’t find very flattering on a lot of body types. I made one Washi that I had to refashion into something more wearable…Definitely too maternity-like on me! Her patterns always look great on you! Yes, I’m envious 🙂
Great to read your tips on experimenting with knits. I’m in the same boat, still learning and trying out tips as I find them. They are very quick projects to sew!
LikeLiked by 1 person
Nice work! It’s so much better finding the right settings and tools to get the job done. But a bit of testing here and there and you’ve got it!
LikeLiked by 1 person
Pingback: Nursebeansews a lot: 2016 year-end wrap up | nursebeansews
Pingback: Sewing with Knits 102: An Isla Capsule Wardrobe | nursebeansews
Pingback: Pearl Necklace Isla Top | nursebeansews
Pingback: Summer Islas | nursebeansews
Pingback: Nursebeansews 2017: Year-End Round Up | nursebeansews
Pingback: Me Made May 2018 Week 1: Sewing with Knits | nursebeansews
Pingback: Spring Isla Dress With Jade Sleeves | nursebeansews
Pingback: Me Made May 2019: Front Porch Fashion | nursebeansews